|
SERIES
II, IIA & III (4 CYLINDER).
Thank you
for purchasing the acoustic mats system from Wright Off Road. You will
need;
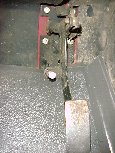
IMPORTANT: DO NOT CREASE YOUR MAT. Please bear in mind that there is a lot of variation in the floor area BULKHEAD MAT. The Bulkhead mat should be fitted first. You will need to remove any equipment/plates that are fixed to the bulkhead. You will find witness marks on the underside to show the location of the fixings for the rectangular Smiths heater. There is also a mark for the dipswitch that can be drilled for the wires. Take the switch off, feed the wires through the mat. Locate the mat against the bulkhead and re-fix the equipment. It does not require gluing, as it is self-supporting. You may require some additional fixings, if so we recommend self-tapping screws with a washer to increase the head size. Series III owners can use the vehicle identity pates from the bulkhead. If you have the rectangular Smiths heater, drill the holes in the mat, undo the lower fixings and slide the mat behind the heater, leave the lower fixings loose until you have fitted the floor mat. SEAT BOX MAT. The Seat box should be fitted secondly. It is supplied as a blank, and requires cutting to suit your requirements. It will give the best acoustic properties if it is fitted as it is but you may require access to one or all of the seat box panels. On the underside of the mat you will find a number of witness marks that correspond to the features of the seat box. Firstly cut the hand brake lever hole. The feint marks are present for either left or right hand drive. Use the gaiter retaining plate as a template. Any cutting should be done with a Stanley/heavy duty craft knife, make sure you use a new blade and you have a supply of new blades as you will need to replace it shortly. As the mat is so dense, it will blunt blades quickly. You can use oil to lubricate the blade, it will not affect the mat. PLEASE BE CAREFUL, USE A STEEL STRAIGHT EDGE TO CUT AGAINST. Best method is to cut through in two or three passes. If you have an untidy cut edge you can sand it with a medium/fine grade paper. The seat box lids can be cut in the same way and using the witness marks provided and the lids as a template. Seat fixing holes are also marked. Position the mat on the seat box and mark through from underneath the seat fixing holes to double check positions, then move it forward to expose the lids and seat fixing holes. These positions can then be transferred to the mat. Its up to you how you cut the panels, you can leave a hinge at the rear edge or have removable panels. You could also remove all the hasps. Use the seat box lid as a template. The seat frame/runners can be bolted down on top of the mat, don’t over tighten, as the mat will deform. Use locking nuts. Depending on the seats you are using, you may need to cut a lid panel to allow the seat to be fixed. Once the mat is in place on the seat box with the entire cutting complete, you can re-fit the seats, handbrake gaiter and fixing plate on top of the mat. With care you could find the original gaiter fixing holes, for speed, drill new ones. Make sure the seat slide rails work and engage properly, (if fitted). FLOOR MAT. The floor mat should be fitted last. It shouldn’t require any cutting apart from a hole for overdrive if you require one (Please specify on ordering) and drilling for the accelerator pedal stop. Large holes should be drilled with either a taper drill, hole saw (tank cutter) or step drill. Firstly remove the red knob and gaiter from high/low lever plus yellow knob and spring from high range 4x4 lever. Next remove gearbox level inspection plug, both if present, (the big rubber one’s that you have never used!) and the gear lever grommet. You can also remove the clutch slave cylinder inspection plug. The mat will take the place of these. If you wish you can cover the inspect hole with gaffer tape. You can use the mat to retain the transfer lever gaiter on the floor or re fit it on top of the mat. Now is the time to treat the floor area to rust proofing if you are concerned about trapped water, Wax oil is probably the best and can now be used on the inside floor area under the mat. Lower the mat over the gear lever, angled downwards at the front. Aim the leading edge under the pedals and feed the remaining levers through the corresponding holes. If you have the rectangular Smiths heater, make sure the leading edge of the mat goes under and behind it. Now you know why you left it loose. Feed the mat under the handbrake. Now starts a small amount of pushing and grunting to position the mat to give the best fit. You may not have any room for adjustment and please bear in mind that there is a lot of variation in the floor area. The mat is designed to take up a lot but try and get the moulded in gear lever grommet in the correct position around the lever to give the best aesthetic fit. Refit the yellow knob and spring. The transfer lever gaiter and its fixing plate plus the red knob can now be refitted. To secure the gaiter, put the lever in the neutral position and position the gaiter so it does not interfere with the operation of the level. Make sure that both high and low can be selected without the gaiter pulling the lever out of gear. Mark the position and self tap straight to the floor. (Customers have fitted the mat over the high/low lever, leaving the gaiter on the floor. This is possible but again make sure it doesn’t interfere. If you wish to do this, discard the retaining plate as the mat will take its place.) If you have the floor mounted dipswitch, that can be self-tapped through the mat to the floor. The pedal stop can now be drilled from under the foot well and refitted. MAKE SURE THE PEDALS HAVE FULL RANGE OF TRAVEL AND DON’T FOUL THE MAT SYSTEM.
CLEANING The Mat
system will be covered in a light mould release agent. |